I distinctly remember, turning into a teen, becoming obsessed with make-up and since starting my blog throughout that time people who have come to know me will know that I have a thing. A thing about eyebrows. I absolutely LOVE a good, clean, crisp brow. I have always struggled with having fairly thin, sparse and generally long-haired eyebrows. I have never been able to get that full brow look.
I’ve dabbled in different types of eyebrow products and for the past few years I am happy to say that I have started to fill in my brows and Lord am I happy to have fallen in love with Eyebrow Cake by Illamasqua!
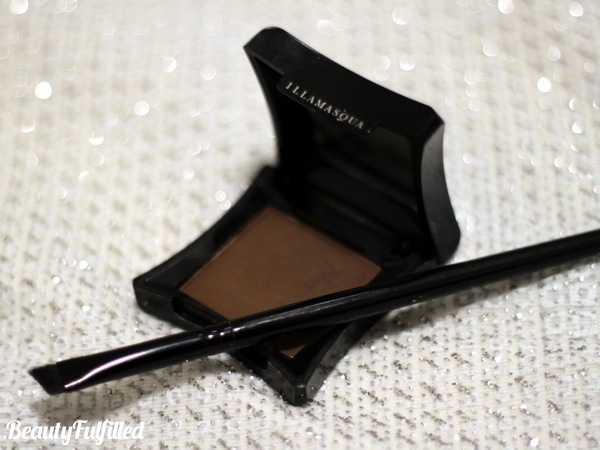
Eyebrow Cake by Illamasqua in the shade ‘Thunder’ £15.50 available HERE
I’ve been using this for a good 6 months now and I would genuinely not go back to using a plain eyeshadow to fill in my brows. Eyebrow Cake has the right amount of powder and wax combination to not only tame your brows but give them that super perfect filled-but-not-drawn-on look ![]() Now, I use this dry but it can also be used wet for an even more precise look.
Now, I use this dry but it can also be used wet for an even more precise look.

Angled Brush by Illamasqua £19 available HERE
I fill my eyebrows in with the Angled Brush by Illamasqua which is by far THE best angled brush I have ever used. It is so precise, sharp and easy to use. It is my first Illamasqua brush I have owned and it’s definitely got me intrigued and wanting to try more. The combination of this brush and Eyebrow Cake is a match made in heaven! There’s no eyebrow post without me showing you just exactly how I use this. Cue pictorial below…

Step 1
Make sure your eyebrows are tweezed and your skin is clean. I like to apply my foundation before doing my brows, but it’s not needed.
Step 2
Start by applying some Eyebrow Cake with an angled brush on the bottom of your eyebrow. Try and do this in one stroke and try to get this as neat as you can. You can always go back and add more product once you’ve got the basic shape you’d like. Be careful not to start too close to the inner brow - unless you’re going for a heavily filled in look.
Step 3
Line to top of your eyebrow again following the same rules as step 2.
Step 4
Now it’s time to fill in between the two lines you have made on the top and bottom of your eyebrow. Again, try not to fill to heavily at the front of your eyebrow - you don’t want to look like you’ve drawn them on with a sharpie (that’s not a good look!). Using small brush strokes will make it look very natural - this is the best way to sort out the inner part of your eyebrows.
Step 5
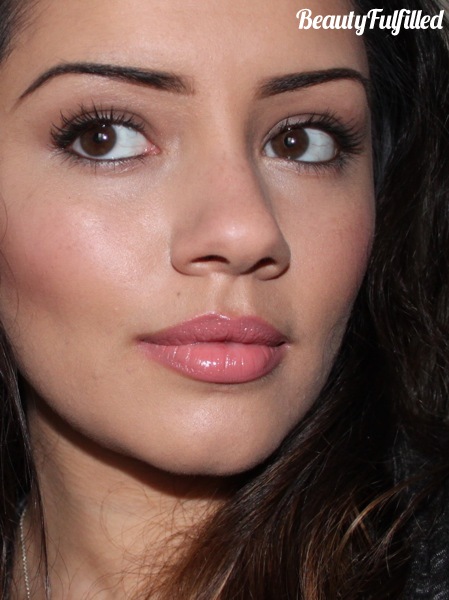
Conceal, conceal, conceal! The last and possibly the most important step is to conceal the bottom and top part of your brows to give you a super clean finished look. I personally don’t like to use too much concealer but just enough to make my brows look neat ![]() And tah-dah, you’re done!
And tah-dah, you’re done!

What are your thoughts on filling in eyebrows? Have you tried Eyebrow Cake by Illamasqua or any of their brushes before? I’d love to know your thoughts!
Kaushal


I’ve wanted to try this for so long and now I’m definitely going to have to pick one up!
Jazzie x
miniinstilettos.blogspot.com
Hope you like it x
x
Oooh, your brows look fantastic! I’m recently experimenting with filling in my brows/brow products in general so I think I’ll definitely give this a shot after I finish my Anatasia Brow Wiz pencil! xo
Thank you so much, my lovely! X
Stunning as usual! Eyebrow envy! My brows are sparse, long haired and short so don’t frame my face x
x
Thank you, hun! Mine aren’t nice when they’re not filled in X
Wow. Makes me want to try this as well. Loved the lipstick you are wearing. Which one is it?
Thank you I believe it’s ‘Let’s get naked’ by Rimmel x
Gorgeous. I also do my own brows (after many ppl in salons kept messing with their natural shape).
You look great, do you ever think about growing them thicker?
Love your blog ♥